Premium Installation & Configuration
This page provides an overview of the installation process, methods of blocking unwanted visitors on specific pages/posts and various settings available within Proxy & VPN Blocker Premium.
Installing Proxy & VPN Blocker Premium
After Purchasing Proxy & VPN Blocker Premium you will be provided a download for the Proxy & VPN Blocker Premium Plugin Loader.
- Upload the ZIP file through the ‘Plugins > Add New > Upload’ screen in your WordPress dashboard.
- Activate the plugin through the ‘Plugins’ menu in WordPress.
- Go to Proxy & VPN Blocker Premium Settings.
- Insert your Proxy & VPN Blocker Premium License Key (Beginning with PVB-).
- You should now see that there is a Plugin Update available for Proxy & VPN Blocker Premium, if not, go to the Updates Page in your WordPress Dashboard, this should trigger the update check and show that Proxy & VPN Blocker Premium update from version 0.0.0p to Current Version: 3.1.0p is available.
After this, Proxy & VPN Blocker Premium will be ready for use and you will see that the full range of settings are available under 'PVB Settings'.
Blocking Proxies and VPNs on Specified Pages and Posts
Proxy & VPN Blocker Premium provides a several methods to select your pages and posts for blocking.
1. Proxy & VPN Blocker Premium Admin Bar Menu
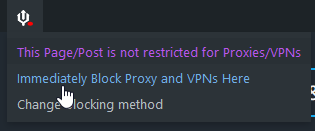
When viewing a Page or Post on your WordPress Site while logged in to your Admin account you will see the Proxy & VPN Blocker Premium logo as a Menu item.
If a Page/Post is not selected for blocking the logo will show a red dot and in the menu will be the text "This Page/Post is not restricted for Proxies/VPNs" Below this is a menu item titled "Immediately Block Proxies and VPN's here", clicking this will instantly set that particular Page/Post for blocking.
Conversely, if a Page/Post is selected for blocking the logo will show a green dot and in the menu will be the text "This Page Post is currently restricted for Proxies/VPN's" Below this is a menu item titled "Immediately Unblock Proxies and VPN's here", clicking this will immediately allow Proxies/VPN's on the particular Page/Post.


2. Bulk Actions
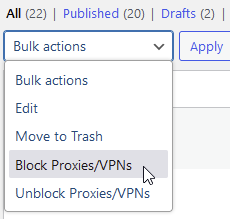
On the WordPress Dashboard Posts/Pages lists there is a Bulk Action where you can select multiple pages/posts to Block or unblock Proxies/VPN's at the same time.
These lists also show the current Proxy & VPN Blocker Premium Status for every Post and Page at a glance.
3. WordPress Editor Sidebar
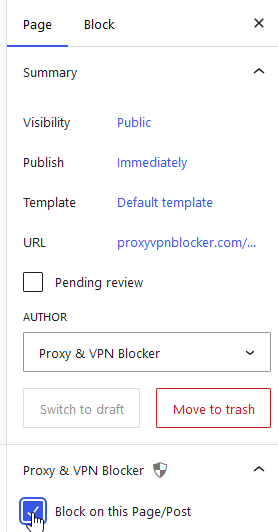
On the WordPress Editor there is a sidebar option so you can select the Page or Post for blocking before you Publish (Or, later on when Editing).
Here you are also able to select which blocking method you would like to use, in Proxy & VPN Blocker Premium you are able to select either Block Page, Captcha Challenge Page or a UR Redirect (either to a page within your site or an external site.) and this is configurable for every Post and Page so one page could be a captcha challenge and another can be a block page.

Proxy & VPN Blocker Premium License Key (text Field)
After installing the Plugin to your WordPress please go to 'PVB Settings > Main' in your WordPress Dashboard and you will see that there are multiple settings that you can configure, one of which is the License Key field.
In order to get updates you will need to input your License Key which can be obtainted from the Proxy & VPN Blocker Premium Page.
Enable Proxy & VPN Blocker Premium (toggle)
Turning this off disables querying the proxycheck.io API and thus the plugin will be inactive.
proxycheck.io API key (text Field)
After installing the Plugin to your WordPress please go to 'PVB Settings > Main' in your WordPress Dashboard and you will see that there are multiple settings that you can configure, one of which is the API Key field.
It is not necessary to have an API key to use this Plugin's basic features but note that it would be limited to 100 daily queries with proxycheck.io.
A free API Key gives you 1,000 daily queries and is simple to get just by entering your email address to sign up with proxycheck.io. There are also paid plans available.
If you have an API Key, enter it in the API Key field of Proxy & VPN Blocker Settings.
Remote Visitor IP Header (dropdown with text field for custom entry)
Default: REMOTE_ADDR
If you are unsure, please leave as default. Though it is recommended that you check that the correct IP is displayed under PVB Debugging - Please see the note below regarding this.
If you are using Cloudflare please select HTTP_CF_CONNECTING_IP
You may enter a Custom Entry in the field contained within this dropdown list (in the format CUSTOM_IP_HEADER) if your hosting provider or CDN (Content Delivery Network) has a specific header for providing the Visitors actual IP Address.
Note: You may confirm if the IP header is correct by enabling PVB Debugging under the Advanced tab in PVB Settings then going to the PVB Debugging tab that will appear under PVB Settings in the WordPress Admin Sidebar, this will appear at the top where it says "Checking if we can reach the proxycheck.io API". If the displayed IP matches and there are no errors then Proxy & VPN Blocker should be working fine.
Select Default Blocking Method
Blocking Method can either be:
- Default Block Page
- Captcha Challenge Page
- URL Redirect to another URL or Website
This is the default blocking method used for Pages and Posts on your site unless you specifically choose to use another method on a per Post or Page basis in the WordPress Editor. When selecting Captcha Challenge Page please make sure you have configured the Captcha Settings for your chosen Captcha on the Captcha Challenge Page settings tab.
Detect VPN's? (toggle)
By default only Proxies are checked for, if you would like to also block VPN's turn this setting to 'on'.
Log User IP's Locally (toggle)
When set to on, User's Registration and most recent Login IP Addresses will be logged locally and displayed (with link to proxycheck.io threats page for the IP) in WordPress Users list and on User profile for administrators.
If you used "Register IP's" Plugin previously, Proxy & VPN Blocker will get User Registration IP's saved by this from the DB and will log future registration and most recent Login IP's for each user.
Default Block Page is a customizable (background, logo and text) page.
Sub Options:
- Access Denied Title (text field): This is the title text that is shown on the default "blocked" page shown to visitors who are blocked. You can change this to say anything you like (e.g. another language than English).
- Access Denied Message (text field): This is the message that is shown on the default "blocked" page shown to visitors who are blocked. You can change this to say anything you like (e.g. another language than English).
- Show Home Link: This shows a link back to your site's home page on the Block Page.
- Block Page Background (media select): Allows you to select an image to use as a background on the Block Page.
- Block Page Logo (media select): Allows you to select a logo to use on the left side of the Block Page.
Following the above options are a selection of color options for your Block Page.
Captcha Challenge Page is a customizable (background, logo and text) page that displays a captcha challenge to detected visitors on your protected assets.
Sub Options:
- Captcha Option (Select): This can be either Cloudflare Turnstile, hCaptcha, ReCAPTCHA V2 (Checkbox), or ReCAPTCHA V3 (invisible).
- Cloudflare Turnstile Secret Key (text field): Enter the Turnstile secret key from your Cloudflare Dashboard.
- Cloudflare Turnstile Site Key (text field): Enter the Cloudflare site key for your site.
- hCaptcha Secret Key (text field): Enter the hCaptcha secret key from your hCaptcha account.
- hCaptcha Site Key (text field): Enter the hCaptcha site key for your site.
- ReCAPTCHA V2 Secret Key (text field): Enter the ReCAPTCHA V2 secret key from your ReCAPTCHA account.
- ReCAPTCHA V2 Site Key (text field): Enter the ReCAPTCHA V2 site key for your site.
- ReCAPTCHA V3 Secret Key (text field): Enter the ReCAPTCHA V3 secret key from your ReCAPTCHA account.
- ReCAPTCHA Site Key (text field): Enter the ReCAPTCHA V3 site key for your site.
- Show to VPN's only (toggle): Shows Captcha Challenge page to VPN's only. Other detected visitors will be blocked.
- Challenge Page Title (text field): Title Text for Challenge Page. You can change this to say anything you like (e.g. another language than English).
- Challenge Page Text (text field): Paragraph Text for Challenge Page. You can change this to say anything you like (e.g. another language than English).
- Captcha Page Background (media select): Allows you to select an image to use as a background on the Captcha challenge page.
- Captcha Page Logo (media select): Allows you to select a logo to use on the left side of the Captcha challenge page.
Following the above options are a selection of color options for your Captcha Challenge Page.
URL Redirect allows you to set a URL all positively detected visitors will be immediately sent to the set address.
Sub Options:
- Redirect URL (text field): You can enter a custom redirect URL here.
Risk Score Checking (toggle)
The plugin optionally supports proxycheck.io risk scores. You can individually set a risk score for both Proxies and VPN's.
Risk Score Proxy (slider)
For example, if we set a minimum risk score of 33 for Proxies, any Proxy with a risk score below 33 would be allowed through and any Proxy with a Risk Score higher than this will be blocked.
Risk Score VPN (slider)
if we set a minimum risk score of 66 for VPN's, any VPN with a risk score below 66 would be allowed through and any VPN with a Risk Score higher than this will be blocked
Locational Restrictions
This feature is ideal if you would like to block ALL visitors from specific countries and/or continents, select them from the list.
Important: If you block your own country/continent here you WILL lose access to your website, you will have to upload a blank .txt file called disablepvb.txt to your WordPress root directory, Proxy & VPN Blocker actively checks for this file and if present, will not check connecting IP's. You can then remove your country/continent from the list in PVB Settings and then delete the disablepvb.txt file.
Country/Continent (list)
Select countries/Continents in this list (you can type to search).
By default, countries entered here are blocked.
Treat Country/Continent List as a Whitelist (toggle)
If this is turned 'on' then the Countries/Continents selected in the list above will be Whitelisted instead of Blacklisted, all other countries will be blocked.
Read The Warning!
Enable Email Filtering (toggle)
Enables sending Email Addresses on user registration to the proxycheck.io API for checking.
Note: It costs one query for Disposable Email check. On registration this would be in addition to the one query for the Proxy/VPN check, so two queries are consumed.
Send Email Anonymously (toggle)
This will send an anonymized email address to the proxycheck.io API (e.g: [email protected]). It is only really needed to check the email domain (after the @) but we must send a complete email address.
These settings are for the proxycheck.io Cross-Origin Resource Sharing (CORS) API feature. This is intended as a fallback feature in cases where the PHP Version of the API Calls are not functioning, generally this is is the case if you are using a Caching Plugin or if the page is loaded from a web caching service. Also do note that this can work with specific pages/posts or block on all pages, but does not work with settings under 'Risk Scores', 'Block Action', 'Restrict Country/Continent' and 'Email Filtering' tabs. It is recommended that you use Custom Rules on proxycheck.io for specific tuning of how IP's are blocked here.
proxycheck.io CORS Support (toggle)
Enable proxycheck.io Cross-Origin Resource Sharing (CORS)
Automatically Alter Origins (toggle)
Automatically Add/Remove origins from CORS origins list on proxycheck.io, note that Dashboard Access is required to be enabled on your proxycheck.io dashboard, it is also not recommended to use this setting if multiple WordPress sites are sharing the same API Key!
CORS Public key (text field)
Your proxycheck.io Cross-Origin Resource Sharing (CORS) Public Key from your proxycheck.io dashboard (you will find this under the CORS tab).
This key must start with 'public-'. if the key doesn't start with 'public-' it is not the correct key. This field will not accept a non 'public-' key.
proxycheck.io CORS Protect on Web Cache Services (toggle)
Use proxycheck.io Cross-Origin Resource Sharing (CORS) to protect the site from being viewed by Proxies & VPNs in Web Cache. (e.g. Google, Bing, Archive.org).
Use Anti Adblock CORS javascript (toggle)
Use the Anti Adblock version of the CORS javascript - Some Ad block lists have added the proxycheck.io domain name, this means that CORS will not function. When this setting is on we can detect if this happens and throw an error when a connection to proxycheck.io is blocked.
BETA: Add DONOTCACHEPAGE Headers (toggle)
This will only add no cache headers to your selected Pages and Posts and Login in order to prevent them from being cached by WordPress cache plugins in order to allow visitors to be checked and blocked as necessary, instead of cache serving them the page anyway.
Custom Tag (text field)
If you enter a custom tag in this field this will show next to IP's in your Positive Detection Log rather than the URL of the querying site/page.
Known Good IP Cache (slider)
By default, IP's that are detected as clean are cached for 30 minutes so as to not slow them down too much and to also reduce the number of queries made. You are able to set this to between ten minutes and 240 minutes (4 hours).
Last Detected Within (slider)
By default, IP's are checked for proxy/vpn activity within the last seven days but you are able to configure this to between one and 60 days. One day would be very liberal and 60 days would be very strict. We recommend that this setting is not changed from the default.
Protect login authentication (toggle)
This option blocks Proxy/VPN's on Login Authentication.
It is not recommended under any circumstances to turn this off.
Block on Entire Site? (toggle)
This feature is not recommended to be used however it was added on request. This WILL result in much higher query usage to the proxycheck API.
This will block people using Proxies and (optionally) VPN's on all pages of your site!
Note: This will not work if you are using a page caching plugin.
Proxy & VPN Blocker Help Mode (toggle)
Allow Staff Bypass (toggle)
proxycheck.io 'denied' status emails (toggle)
Turning this option on will allow Proxy & VPN Blocker to send you an email (Via your WordPress admin email address) if the Plugin encounters a 'denied' error when attempting to make a query to the proxycheck.io API. This could have one of the following messages:
| Your access to the API has been blocked due to using a proxy server to perform your query. Please signup for an account to re-enable access by proxy.
(# of queries plan has) Paid queries exhausted. Please try the API again tomorrow or purchase a higher paid plan. (# of queries plan has) Paid queries exhausted and a burst token has already been consumed. 100 queries exhausted, if you sign up for a free API key you'll be able to make 1,000 free queries per day. You're sending more than 125 requests per second. |
This is limited to sending an email every three hours and will cease when the 'denied' message clears.
Your admin email will not be used for anything else and is not viewable outside of your WordPress installation.
proxycheck.io has a built in, almost instant queries exhausted email feature that you may use instead of this. You can find this on your proxycheck.io dashboard.
Proxy & VPN Blocker Debugging (Experimental) (toggle)
A new option has been integrated in 1.8.2 which enables a debugging page that outputs information which may be useful for the developer to help diagnose any issues that you may be experiencing
It is NOT recommended to leave this option on at all times because of the possibility that in future this feature will be expanded upon with things that may result in higher load and make queries take slightly longer. Only enable this option if you need debugging information!
Cleanup on Uninstall (toggle)
This option is off by default since introduction, now when deactivating and removing the plugin, the settings will not be cleared unless this option is enabled.

